Misha
Site Founder
Ahoy folks, today I wanted to cover one of the most tedious level up processes in the game, involving the Potions Minigame.
Potions are widely regarded as the utmost tedious skillset in the game to master, and this can be amplified if the player is not able to consistently place the same parts together. Today, I want to teach you how to get better at potions so that this grind becomes less of a stress test, and more of a patience game.
Firstly, let's have a vocabulary quiz: Board Rule
Board rule is the terminology used to describe a pattern used to brew specific potions that is utilized to avoid overcrowding, which can cause you to fail. Utilizing board space in the 8x10 playing space that the game gives you is imperative to completing potions, as you only gain EXP from completing the separate parts of the potion, and completing the full minigame at the end.
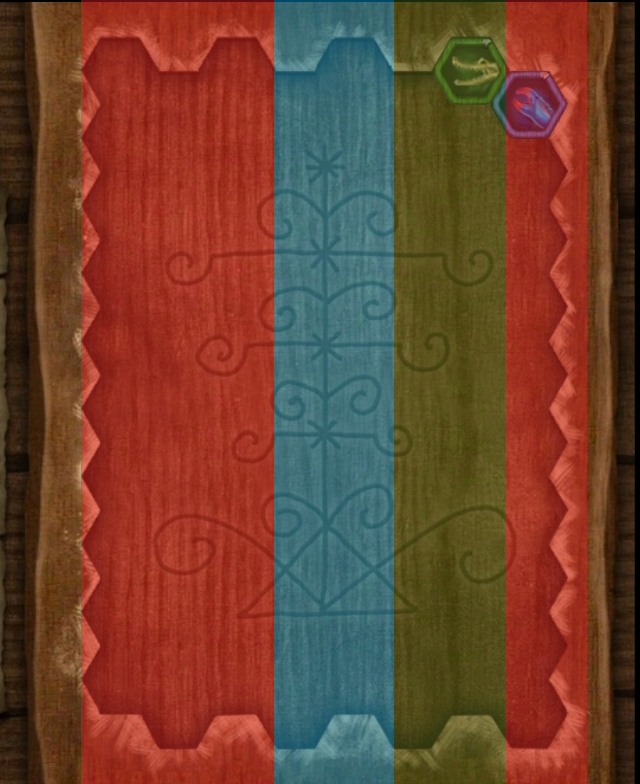
Board Rule - Port Royal
Port Royal, unlike the other three major brewing locations, does not have its own specific set-piece on the board. This means that doing potions on Port Royal allows you to utilize the RGB pieces to cover any of the nine available color combinations that appear.
The pattern utilized below is a 3/2/2/1, in the order RRR/BB/GG/R

NOTE: This is the only Port Royal board rule that I will be showing off in this guide, however, there are other patterns that work.
Board Rule - Padres, Tortuga & Cuba
Padres Del Fuego, Tortuga, and Cuba each gain a respective set piece in the form of Lava Essence, Gold Essence, and Cursed Essence, which can cause the board to fill up much more rapidly if you have no idea how to deal with the new pieces that are being mixed in.
I present to you the 1x8 board rule, utilizing mixed pieces and going in the following order: P/R/B/P/G/B/R/G

NOTE: This Board Rule works for all three of the aforementioned islands, just replace the Bone, or P with the respective essence.
At first glance, the glaring issue with this board rule to anyone who is familiar with how Potions work is the very distinct lack of two of the same color touching, which can lead to issues with stacking a different colored piece underneath or above one another. HOWEVER, after extended testing utilizing this board rule for beginner potions such as Ghastly Visage and Flatulent Fizz, I can note that this board rule is the most consistent method of clearing out the island-specific set pieces.
Level Up Process - Port Royal
This method of leveling potions is useful in that it can be done from 1-20 on Port Royal, eliminating travel times as you can knock out the entire process in one fell swoop. It should be noted that Levels 10 and above will take marginally more time due to the fact that you are not utilizing potions that are at your current level, and are instead opting in for Swift Foot, which utilizes the RGB pattern that Port Royal is well used for.
Level 1: Marksman Draught I or Swashbuckler Stew I
Level 2: Cannoneer Draft I
Level 3: Swift Foot I
Level 4: Swift Foot I
Level 5: Lively Bucko Brew I or Swift Foot I
Level 6: Marksman Draught II, Swashbuckler Stew II, or Swift Foot I
Level 7: Cannoneer Draft II
Level 8-11: Swift Foot II
Level 12: Cannoneer Draft III or Swift Foot II
Level 13-19: Swift Foot III
Level 16-19: Clap O'Thunder
Mastered!
Level Up Process - Alternative
Note: This version of the process utilizes teleporting between the different main islands, so having the teleport totems (or a friend) is best!
Level 1: Marksman Draught I
Level 2: Cannoneer Draft I
Level 3: Swift Foot I
Level 4: Swift Foot I
Level 5: Ghastly Visage
Level 6: Marksman Draught II or Swashbuckler Stew II
Level 7: Cannoneer Draft II
Level 8: Swift Foot II
Level 9: Puke Potion or Swift Foot II
Level 10: Lively Bucko Brew II or Swift Foot II
Level 11: Lively Bucko Brew II or Swift Foot II
Level 12: Cannoneer Draft III or Lively Bucko Brew II
Level 13: Swift Foot III or Phantom Spirits I
Level 14: Swift Foot III or Phantom Spirits I
Level 15: Hardy Matey I
Level 16: Clap O'Thunder or Hardy Matey I
Level 17-19: Lively Bucko Brew IV, Clap O'Thunder, or Hardy Matey I
Mastered!
NOTE: Potions are now affected by sources of Double EXP, such as GM events, and the St. Patricks' Day, Father's Day, and Hollowed Woods quest rewards. They are however NOT affected by Crew Bonus or Crew Days.
Edits
v1.01 - Re-organized the text to have it centered and reworded confusing sentences. (HW 2018)
v1.02 - Added separate board rule and more streamlined level up process.
Potions are widely regarded as the utmost tedious skillset in the game to master, and this can be amplified if the player is not able to consistently place the same parts together. Today, I want to teach you how to get better at potions so that this grind becomes less of a stress test, and more of a patience game.
Firstly, let's have a vocabulary quiz: Board Rule
Board rule is the terminology used to describe a pattern used to brew specific potions that is utilized to avoid overcrowding, which can cause you to fail. Utilizing board space in the 8x10 playing space that the game gives you is imperative to completing potions, as you only gain EXP from completing the separate parts of the potion, and completing the full minigame at the end.
Board Rule - Port Royal
Port Royal, unlike the other three major brewing locations, does not have its own specific set-piece on the board. This means that doing potions on Port Royal allows you to utilize the RGB pieces to cover any of the nine available color combinations that appear.
The pattern utilized below is a 3/2/2/1, in the order RRR/BB/GG/R
NOTE: This is the only Port Royal board rule that I will be showing off in this guide, however, there are other patterns that work.
Board Rule - Padres, Tortuga & Cuba
Padres Del Fuego, Tortuga, and Cuba each gain a respective set piece in the form of Lava Essence, Gold Essence, and Cursed Essence, which can cause the board to fill up much more rapidly if you have no idea how to deal with the new pieces that are being mixed in.
I present to you the 1x8 board rule, utilizing mixed pieces and going in the following order: P/R/B/P/G/B/R/G
NOTE: This Board Rule works for all three of the aforementioned islands, just replace the Bone, or P with the respective essence.
At first glance, the glaring issue with this board rule to anyone who is familiar with how Potions work is the very distinct lack of two of the same color touching, which can lead to issues with stacking a different colored piece underneath or above one another. HOWEVER, after extended testing utilizing this board rule for beginner potions such as Ghastly Visage and Flatulent Fizz, I can note that this board rule is the most consistent method of clearing out the island-specific set pieces.
Level Up Process - Port Royal
This method of leveling potions is useful in that it can be done from 1-20 on Port Royal, eliminating travel times as you can knock out the entire process in one fell swoop. It should be noted that Levels 10 and above will take marginally more time due to the fact that you are not utilizing potions that are at your current level, and are instead opting in for Swift Foot, which utilizes the RGB pattern that Port Royal is well used for.
Level 1: Marksman Draught I or Swashbuckler Stew I
Level 2: Cannoneer Draft I
Level 3: Swift Foot I
Level 4: Swift Foot I
Level 5: Lively Bucko Brew I or Swift Foot I
Level 6: Marksman Draught II, Swashbuckler Stew II, or Swift Foot I
Level 7: Cannoneer Draft II
Level 8-11: Swift Foot II
Level 12: Cannoneer Draft III or Swift Foot II
Level 13-19: Swift Foot III
Level 16-19: Clap O'Thunder
Mastered!
Level Up Process - Alternative
Note: This version of the process utilizes teleporting between the different main islands, so having the teleport totems (or a friend) is best!
Level 1: Marksman Draught I
Level 2: Cannoneer Draft I
Level 3: Swift Foot I
Level 4: Swift Foot I
Level 5: Ghastly Visage
Level 6: Marksman Draught II or Swashbuckler Stew II
Level 7: Cannoneer Draft II
Level 8: Swift Foot II
Level 9: Puke Potion or Swift Foot II
Level 10: Lively Bucko Brew II or Swift Foot II
Level 11: Lively Bucko Brew II or Swift Foot II
Level 12: Cannoneer Draft III or Lively Bucko Brew II
Level 13: Swift Foot III or Phantom Spirits I
Level 14: Swift Foot III or Phantom Spirits I
Level 15: Hardy Matey I
Level 16: Clap O'Thunder or Hardy Matey I
Level 17-19: Lively Bucko Brew IV, Clap O'Thunder, or Hardy Matey I
Mastered!
NOTE: Potions are now affected by sources of Double EXP, such as GM events, and the St. Patricks' Day, Father's Day, and Hollowed Woods quest rewards. They are however NOT affected by Crew Bonus or Crew Days.
Edits
v1.01 - Re-organized the text to have it centered and reworded confusing sentences. (HW 2018)
v1.02 - Added separate board rule and more streamlined level up process.
Last edited: